Monday, March 29, 2010

Slab is Down!

Now Ken told me last week when I met him that the slab would be poored on either Tue or Wed. It was done today! How can I possibly go away for the holidays if things will get done quickly? I don't want to miss a step. Here's some photos:

Here's the view from my bedroom:

The front view:

The view looking across from the garage. It was looking a bit bigger today.

Just cutting the corner of the garage and looking across the guest bedroom, entrance and then my room.

And just for fun; here's the view of the house from the back. The cement bit on the back of the house is where the water tank will be. And see the garage on the left? All that dirt bit on the left of the photo will be the pergola.


And yes it was raining today. I'm guessing that I will get another letter delaying construction. Things are moving along...

Sunday, March 28, 2010

Pantry & Patty Cakes

I'm getting ready to move into my new house (estimated date around middle of July), so I've been buying some things for it. KMart had a sale on the Sistema containers so I bought up to get my pantry organised.

Here's a photo of before and after:


And then here's the main focus - Sistema containers! I told my sister that I'm getting rid of my Tupperware containers so now I have to save them for her.


Once I had sorted out my pantry and pretty much procrastinated for the entire day (I've just realised that my towels are still on the line) I thought I'd get into some cooking just before I started to prepare dinner.

I got the recipe for the cupcakes at Life In A Peanut Shell. I highly recommend this blog. As per usual when I find a blog I like I can't help myself but look through the ENTIRE blog. I just kept hitting the "older post" button. I save recipes I like and print them out and make recipe cards.

The cupcake recipe uses cake flour. I have come to the conclusion that using cake flour is the way to go. It gives the cakes such an airy texture - oh, and the batter! This is so yummy I could just eat it out of the bowl as a meal - YUMMO!!

I made up the mixture and then divided it into two - one I left plain and the other I added some melted chocolate. Here's what I came up with:

The first was from the chocolate mixture. I placed some white chocolate bits into the mixture once I had put it into the cases. I'm calling these Cupcake Dots (small dots inside big dot on the outside). The icing is something I found in the pantry once I had sorted it out; chocolate icing - just add a little softened butter and hot water. Perfect!

The next cupcakes were Funfetti. I found this idea on Baking Bites. I just love the name! I found some coloured sprinkles and stirred them through the vanilla mixture. The picture isn't too clear but you get the gist of it.


I also made some Marbled Cupcakes by swirling the vanilla and chocolate mixes together. I topped them with vanilla buttercream and Flake pieces.

Finally, I made Chocolate Lover's Cupcakes. I used the chocolate mixture then I used the vanilla buttercream and added melted chocolate to it. I then topped the cupcakes with a smashed up Crunchie bar.

I'm feeling generous this week since it's nearly school holidays - 4 days to go (WAHOO!!) so I'm going to take a selection to the kids in my class.

All up I made 50 cupcakes today. Imagine what I could have done if I hadn't of procrastinated all weekend!

Saturday, March 27, 2010

Waffle Pods

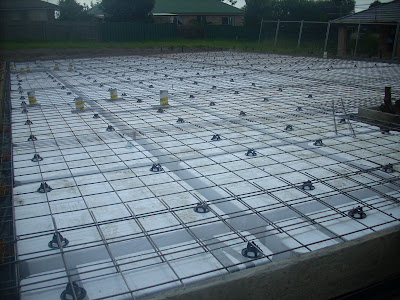
Went up to the block today to see the progress and the waffle pods are in! I didn't realise that these pods are just foam blocks and the reason they are used is to cut down on the amount of concrete needed. This is what the waffle pods look like.

Here's an overall picture of what the pods look like in the foundation. You can see my room at the front and the indent on the right which will be the door entrance.

Here's the view of the front of the house. My room on the left, guest bedroom next and then the garage.

This is the garage. I have to admit; it looks awfully small. Will have to wait and see.

And here's the last photo I'll share for tonight: the view from the other direction. On the bottom right of the photo you can just make out the garage (wood) then it's the guest bedroom, indent for front door and then my room.

Thursday, March 25, 2010

Progress on the Slab

On Monday I went by the house and a little more work had been done. The boards have been put around. We're getting ready for the concrete!

The boards on the left of the photo is where my bedroom will be. Unfortunately, the dirt covers up a lot of the boards. The boards on the right of the photo is the garage.

The photo below shows the boards of my bedroom and the western side of the house.


Today I went by the block again and the workers have put another course of boards around and started putting the plastic and mesh down.

This view is looking from the corner of what will be my bedroom!


This view is looking at the front of the house. My bedroom is on the left. The "indent" will be where the front door will be. The room on the right is the guest bedroom. The garage is then further to the right.


This is the guest bedroom and garage view.


Here we are looking 'through' the garage to the rest of the house.

More photos of the house to come. The concrete should be poured next week. The workers should be finishing off the mesh tomorrow but I won't post any more of those pictures.

Saturday, March 20, 2010

Termite 2 Turns 5!


Today Termite 2 is 5. The time has gone quickly. We took the traditional "I'm 5" photo:


And then Termite 2 got to open his presents:


And then if you ask a 5 year old what he wants for breakfast you're going to get this for an answer:


Rainbow cake for brekkie!


We decided to go to the local Animal Park and when we got to the carpark the boys saw the "bat cave".

We were introduced to John the crocodile. We timed it perfectly as feeding time was just about to start.


The boys really enjoyed feeding the goats:


The boys also liked patting the kangaroos and we also got to go to the talk for the koalas.


Termite 2 chose Creamy Chicken Casserole for dinner (this is my signature dish and I've been making it since my daughter was about three - that's 16 years now!)


CREAMY CHICKEN CASSEROLE

BBQ chicken - diced
420g can of cream of chicken soup
carton sour cream
1 tsp curry powder
ground or smoked paprika
rice to serve

Preheat oven to 180C. Combine soup, cream and powder into oven proof dish. Stir in the cut up chicken. Sprinkle with paprika. Put into the oven as rice is prepared. Mixture should bubble and brown slightly on edges. Serve on rice.

After dinner we got to have the birthday cakes. Termite 2 had requested rainbow cakes so I presumed he wanted the cupcakes I had made a little while ago so I made them. This morning though that, no, he actually wanted a rainbow-in-the-sky cake. Oh well... next year I told him.


I wanted to make Termite 2 a big rainbow cake but I thought a square or round cake with icing on top would be just too boring. I think these turned out OK and putting them into a number 5 was clever!


Termite 2 seems happy enough.

And here's all three:


After dinner and dessert we watched the great movie Finding Nemo. Love it.

A great day!

And just for fun...


I've been searching for the giant cupcake tin and found it on ebay. I won! I found it online for about $75 and I got it way below that price. So I shall be having some fun with it once it comes. I would have liked to have this for Termite 2's rainbow cupcake. How cool would that look?

Friday, March 19, 2010

Sewerage Is In

I went by the block yesterday and found that the pipes are in. These are for the run off for the showers, sinks, drains etc - aka the sewerage. Nothing else was done today.


Here's the view of the left. The first lot of pipes are my ensuite and the ones further up the back are the bathroom and laundry.


This photo is the view of the right of the house. Here you can see the kitchen and second ensuite.


I know these photos aren't the exciting bit yet, but it is all part of the building of my house. This is so exciting really and so surreal as well.

Wednesday, March 17, 2010

Peerings Are In!

Today is Wednesday. I don't work Wednesdays. I thought it would be great to go to my block of land and see the goings on and perhaps meet Ken (my foundation guy), but nobody was there! Oh well...

I did go by the block on Monday as Ken told me the peerings would be going in. Not anything exciting but it's the first step of having the foundation started.


The photo below is me standing on the left of the block.


This photo below is me standing at the middle of the block.


The fence is still there by the way! I just used my camera between the fence thingies (you know, the squares of the fence - how else do I describe it?)

Stay tuned for the next installment!

Sunday, March 14, 2010

OK, So I Did Cook!

Yeh, yeh... so I did cook. And I must admit I wasn't going to mention it, but I came across such a yummy frosting that I have to. First of all let me say that I cooked a yummy Healthy Carrot Cake. I found the recipe at My Baking Adventures.

The recipe uses 1-1/2 cups of grated carrot but it can't be tasted as such. There is a hint of cinnamon which is divine and the cake is so fluffy. And why would I even choose a carrot cake? Well silly me bought a bag of carrots not realising that I already had a bag of carrots in the fridge. Der!

But on its own I thought the cake may seem a bit boring so I had to find a way to add some zing. I had cream cheese in the fridge and I knew that would be good, but I didn't have any icing sugar in the cupboard. What to do?

Google!

And I found this: Whipped Cream Frosting. I had cream in the fridge. Add a little sugar and vanilla and ..... yummo!! This is so simple!


Remember my Chocolate Treasure Cake disaster? I used whipped cream on that cake with grated chocolate folded through. This frosting would have saved that cake I'm sure.

This carrot cake uses oil not butter and is very quick to whip up. I will make this again soon. It's a winner!

All About The Quilting

Today I decided to get out a project I have been cutting out for and make some actual blocks. I had only started cutting out the darks I need for it so I had to go into my light stash and cut out some of the sizes.

First I cut out some 2" strips and made four patches:


Then I used some 3-7/8" squares and made those into half-square triangles:


After these two units were made I put some together to show the block:


Now Termite 1 must have thought I needed a break cause he came over and entertained me by putting on a sock puppet performance. Perfect! Thanks Termite 1.


I continuted on by sewing up the units of the blocks to make 10 blocks:


These blocks will be put into sets of four to make a larger block. I haven't done this yet as I'll wait until I've made all the blocks first, but I did put four together to see how it would look:


Now that's my sewing day. This quilt was in the American Patchwork & Quilting magazine and uses up lots of different sizes of strips. Perfect stashbuster.


So today, it's all about the quilts!